RL Nav Bar Home outlines RL Nav Bar About, outlines Photobucket
Showing posts with label holidays. Show all posts

Thursday, March 17, 2011

Happy St. Patrick's Day!

One whole day when everyone around me shares my adoration for the color green. I love it.

My eyes, my birthstone and, as you can see above, my kitchen - all green. I can't help myself. To see a {small} sampling of the green around my house, you can read this post.

The wall art in the picture is one of my favorite pieces in my kitchen. It looks like wrought iron, but is actually a rubber doormat I found on clearance. It is the perfect shape to hang above my cabinets, and offsets the wow-that's-green paint color I chose (and still love) for the walls.

And, in case you noticed...Why, yes, that is our wireless router peeking out from above the cabinets. You can't see it when you're standing in the kitchen and for some reason that location works best for internet connection. Whatever works!

Wednesday, February 16, 2011

He is mine and I am his

{Holding hands in Virginia on an anniversary trip}

Valentine's Day sure has changed for me over the years. Has it for you? As a little girl I remember getting a heart-shaped pastel pink box of chocolates from my dad every year.

Then I grew into a teenager and stood along side every other pimply-faced girl in the school hoping I'd have roses sent to the office with my name attached to the card.

Valentine's Day as a married person though is 180 degrees different from either of those experiences.

It's better.

I've listened to so many of my friends ache over how their husbands will forget February 14. How no roses will arrive in their cubicle, no remembrance at all.

For me, I don't expect candy and roses, although he often brings them home. Because my husband doesn't just show me love one day in February. He shows me love year-round. Every day of the year.

He changes dirty diapers. Goes to work every single day without complaint. Mows the grass in 110 degree Texas heat. Gets on the floor to play with our son. Prays for me. Eats whatever meal concoction I come up with. Supports my dreams. Surprises me with presents when I least expect them (like an early Valentine's dinner out and tickets to a show last week!!).

Monday, he came home from work late, after an extra-exhausting long day at work, kissed both me and our son as he walked in the door and then hit his head with the palm of his hand and said, Oh, honey! I meant to bring flowers home! (Extra super sweet since we already celebrated Valentine's Day!)

Then he rolled up his sleeves to tackle a sink-full of dirty dishes for me, barely having set his briefcase down.

Who needs flowers, baby? I've got you.

My beloved is mine, and I am his. Forever. For always.

Monday, February 14, 2011

Thursday, February 10, 2011

Homemade Valentine

Every Valentine's gift needs a homemade valentine, right?
I made my precious grandmother, Gigi, a Valentine's wreath this week, but I just knew she needed a homemade valentine to go with it. Something my 2-year-old could scribble his signature on so she could see his "beautiful" penmanship.

I started with heavy white card stock, cut a heart shape out of it and taped a decorative square of scrapbook paper behind it. This may sound easy, but it almost cost me a finger. Me and scissors - apparently not a good combination.

And if I were an avid scrapbooker, I would have just the right sized hole punch I needed. But I'm not, and I don't. So my handyman hubby came up with the idea to punch holes by driving a nail partially into the paper. Genius! Oh, I love that man.
And if I were a knitter or crocheter (is that even a word?) I would have a needle large enough to thread yarn through. But I'm not, and I don't. So I tied thread tightly around one end of the yarn and threaded that through an embroidery needle. You can see my contraption above.
Finished threading? Tie off a double knot and tape over it. Almost done...
But all that taping, threading, knotting nonsense isn't all that pretty. So I cut a coordinating piece of lighter weight card stock and used it to cover my mess, leaving a tiny little bit to peek through to the other side.
Now Gigi will have a homemade valentine from three of her biggest fans.
And, look! It matches the wreath!

Found any favorite homemade valentine ideas lately?

Tuesday, February 8, 2011

Valentine Wreath

Has anyone else been snowed in recently? These major storms are wreaking havoc across the nation, I know, but we are oh-so-not ready for it here. They forecast an inch of snow, and school is canceled, work is called off and there is a run on staples at the grocery stores. Thankfully it is all quick to melt away. But along with the recent snow days came an excuse to get crafty!

Read on to meet this year's Valentine's Wreath, and a step-by-step in case you want to join in the fun.

I started with a Styrofoam wreath form wrapped with red yarn. I didn't use hot glue, but a liquid fabric glue instead. Mainly because I wanted to work on the project in front of the TV. In bed. It was a snow day, people!

The wreath needed a little rosette love (you already know how much I love 'em) so I used some yellow flannel I had on hand.
1. Cut out a circle of fabric. No perfection here.
2. Starting on the outside edge, cut the entire circle into one long spiral strip, ending with a small circle at the end.
3. Start at the end where you started cutting and roll up the strip, leaving a little slack.
4. Glue the small circle end to the bottom of the rosette.

I tried different arrangements for the rosettes and took pictures of each one before I glued them on. It allowed me to easily compare all of the options.
A little raffia to tie her back and she's ready for her big debut. Almost...
This little beauty is headed for my precious grandmother, whom we affectionately call Gigi, so it needed a little extra something-something.
A name pennant made with satin ribbon and scrapbook paper taped together. I secured the ribbon with small pins and more fabric glue.
I guess rosettes aren't the only crafty thing I seem to love these days. Looks like I'll have to add pennant banners to my list also. Remember?

What Valentine's crafty goodness have you been up to lately? I'd love to see!

Linking to:
Today's Creative Blog ... Skip to My Lou ... Beyond the Picket Fence ... Making the World Cuter ...

Saturday, December 25, 2010

Merry Christmas!


Today we celebrate the birth of the Savior. A Savior who chose.

Chose to be born into a family of little means, in a stable full of manure and bellowing animals, to live a life often filled with pain and insult, and endure an unthinkable death.

He chose because he loves me. He chose because he loves you. What an incredible gift.

Rejoice! Merry Christmas!

Tuesday, December 14, 2010

Christmas at our place

Christmas decorating is very low-key at our place this year. I'm not a santa-decoration-on-every-shelf kind of girl, but I still like home to feel festive. Even still, I've noticed there's less decoration around here than normal. Most decorations just felt like clutter this year, for some reason. I've noticed a lot of other bloggers saying the same thing. Can you relate?

Here's a peek at what we are enjoying this year at our place...

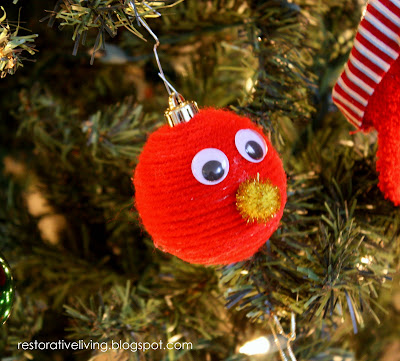
My son and I made this Elmo ornament together using Kojo Design's great tutorial. Thanks for the idea, Kojo! He loves seeing Elmo on the tree!
Easy peasy centerpiece I used for a Christmas dinner we hosted, using ornaments from last year's after-Christmas sales.
I know most of the commercialized use of Believe around Christmas is talking about Santa and all the fun that surrounds that part of Christmas, but for me, I love having this hanging in the center of our living room from our tv console, because it reminds me of my belief in Jesus Christ. He's the central focus of Christmas for us, for always.
So what about you? Did you go all out this year, or did you simplify your decorating traditions?


Linking to:

Thursday, November 18, 2010

Upcycling Halloween Candy

I've already admitted I'm not a Halloween fan. But remember how candy was one of its redeeming factors? It most certainly is. And I stand by my claim. But I'm also noticing there's a little too much of it hanging out in my pantry. Maybe you can relate?

I also noticed that my name was next to "dessert" in the email sign-up for our weekly potluck dinner with friends. Perfect timing, perfect combination.

Halloween candy galore
+ not wanting to go to the grocery store again
= this heavenly concoction


But it's not all saturated fats and hydrogenated oils around here. You already know about my sneaky recipes, so this one should come as no surprise. Have you been hearing the buzz about Black Bean Brownies? I have. And I just did not believe it. It seemed a little too good to be true, in my opinion. But this Halloween Leftovers Trifle calls for brownies, and it seemed like the perfect opportunity to test it out.

The basic idea is that you drain and rinse a can of black beans, then fill the can (with beans in it) with water, then puree it all. Then you add the puree to the brownie mix instead of the traditional ingredients that go along with it. No oil. No eggs. No nothing. Just brownie mix and beans. Sounds absolutely disgusting, doesn't it?

I wish I had a picture of my facial expression as I poured pureed black beans into my beautiful, chocolatey brownie mix.

The results?
Not too bad, actually. They are super dense, and not quite as chocolately as the real thing. But all in all, I'd make them again. Hey, a brownie packed with fiber and protein that doesn't tempt me every time I pass by? Sounds like a winner to me.

Which leads me to the reason the brownies are here...and a recipe that will tempt you every time you open the fridge.
Halloween Leftovers Trifle

1 brownie recipe, prepared
1 pkg instant chocolate pudding (6 serving size)
16 oz frozen whipped topping
1 1/2 C milk
Candy bars, crushed
Chocolate syrup, for garnish

Prepare brownie mix and bake according to package directions in a 13x9 pan. Cool and crumble.

Prepare chocolate pudding mix according to package directions, omitting half of the milk. Let cool, then fold in 8 oz of the whipped topping.

Layer brownies, chocolate pudding, crushed candy bars, whipped topping.

Repeat, finishing with whipped topping. Garnish with crushed candy bars, and chocolate syrup.

Chill 8 hours.

If you can keep your hands off of it for 8 hours, you'll have this:

Not a bad way to use up leftover Halloween candy, huh? I can't wait to see the reactions from our friends after they realize they just devoured a dessert filled with black beans. Have you tried these sneaky brownies yet?

Saturday, November 13, 2010

Christmas Cookies...It's Time

One of my recent assignments in my day job as a writer was to compile a list of cookie recipes, take pictures of the results and try not to gain 15 pounds. Easier said than done, I might add. It seemed like a no-brainer until I realized I had missed a word in the article description...Christmas. Christmas cookies?? In November?!
Thankfully, there are a lot of gals out there with their brains already in December who were willing to share their tucked away family treasures with me. It made me try some recipes I never would have otherwise. And a few that I will never try again...see Peppermint Candy Cane Cookies above. They are evil. I think I made 4 dozen of those things and the above pictured cookie is the only one that was photo-worthy.

As I was popping baking sheet, after baking sheet of cookie dough into the oven, I started realizing that in a month and a half, I would be doing the exact same thing all over again. All of that work. All of that time. All of that money spent on ingredients.
If only there were a way to make them last until December...


My initial thought was vacuum bagging. But (1) I don't have a vacuum sealer and (2) I didn't want to crush the delicate cookies I had just invested hours of my life in made. So I improvised.

To vacuum seal without vacuuming (make sense?), all you need is a zip-top baggie and a regular ol' straw. I put the cookies in gallon-sized bags and then sealed them all the way except for just enough room to insert a drinking straw.
Then I sucked as much air as I could out of the bags, quickly removed the straw and sealed the zip-top. The result is "vacuum-sealed" cookies that aren't crushed.Now I've got 3 gigantic batches of cookies pre-made and ready to go for the holidays. No stressing over holiday baking for me this year. Do you plan to join the November Christmas cookie bandwagon, too?

What's that?... You saw FOUR different types of cookies pictured and only THREE types remain in my freezer? You do the math...

Monday, November 1, 2010

Candy Corn Ruffle Bottoms

Halloween is over! I mean, ahem, Awww, man! Halloween is over already? Bummer.

I didn't hide my excitement very well, did I? I've already admitted that I'm not a Halloween fan. There is one giant redeeming factor about the holiday, however. Candy corn. Candy corn. Candy corn! I may have eaten a bag of it by myself in the last week or two. But my favorite kind of candy corn is this little number...

Candy Corn Ruffle Bottoms...
I took the fastest, sloppiest pictures ever for these. I had a lunch date with a precious little one month old Haper Jane who was receiving these little candy corn ruffle bottoms as a gift. And I was late! Imagine that...

To make the bloomers, I used Dana's diaper cover pattern found here and added ruffles to the backside. Her pattern was easy to follow and her sizing was spot-on. I used the 0-3 month pattern and it fit perfectly. The top cream ruffle was leftover from this project. The orange and yellow ruffles I made by pleating the fabric underneath my presser foot as I sewed. I hemmed the edges by folding under 1/4", twice.
Not wanting to sew your own? Ivy&Mae sells a similar version here.

OK, I'm not a 100% Halloween hater. I love the community that develops because of all the trick-or-treating. Texas is so wonderful. Even on Halloween the weather was warm enough that we could all sit out in our driveways, wear shorts and t-shirts, and enjoy chatting with each other while we greeted the costumed kiddos.

I was glad I had read this post before the doorbell started ringing, though. It was a good reminder of what an opportunity Halloween is to be a blessing, instead of my first thought which was to turn the porch light off and watch the Rangers! (Texas in the World Series??! Yes, please!)

And just for kicks (and to further prove I'm not a Halloween hater). Here's some fun spooky decor we've enjoyed recently.


I hope everyone's November is off to a great start!

Tuesday, October 26, 2010

Halloween is coming...

I'm not a huge Halloween fan. If it weren't for my child looking absolutely ADORABLE in his costume every year, and if a pound of free chocolate didn't end up at my house as a result, I probably could forgo the event all together.

I don't do scary movies. I won't even listen to ghost stories around a camp fire. But my sweet friend Jessica decided to host a Halloween murder mystery dinner at her house, and I had to say yes. Because that girl knows how to throw a party!

Her entire house was decorated for the event, including swapping out the lights in her kitchen for purple and orange bulbs to give the room an eery glow. Candles were everywhere (some real, and some LED...which led to a few fire mishaps. ouch!), fake skulls and spider webs were on every table, and spooky old movies were playing in the background. She even created a fake crime scene in her sun room to go along with the story.

My favorite part though was the food. You'll have to excuse some really poor quality pictures because it was so dark that I had to use my flash. She is so creative!

Mummy Dogs dipped in Blood...
Punch that glowed...
I will not own up to how many of these chocolate spiders I ate...(Oreos dipped in chocolate, with pretzels as legs and peanut butter M&Ms as eyes)
Bat Wings and Bloody Witch Fingers (chicken wings)

Vampire Eyeballs (mozarella balls...but they were so slimy it was creepy!!)
I didn't open with this picture because, well, you wouldn't have kept reading.
Creepy mantle. Purple twinkle lights were on every surface and made the place very eery!
And, of course, candied apples. I love the raffia!
And I'm happy to say that my character was not the "murderer" in the story! Whew!

We had so much fun together, dressing up and laughing almost nonstop that we plan to take turns hosting one at every holiday. I think I'm up next for Christmas. I don't think it will be possible to top Jessica's ideas!
Have you every hosted a murder mystery dinner? Any ideas for my Christmas-themed one coming up?

Monday, July 5, 2010

These are pictures from last night's fireworks - the first fireworks my child had ever seen. He loved it (which was a relief - because really, it could have gone either way). I hope everyone is enjoying their 4th (& 5th)! We love the 5th as well because it means the hubby has a day off of work! Woo hoo!

Anyone else have pictures on their blog of the fireworks they enjoyed? I'd love to see!